
| PREP TIME | REST TIME | COOK TIME | TOTAL TIME |
| 5 mins | 45 mins to 24 h | 10 mins | 1 to 24 hours |
Pan-seared flat iron steak, infused with butter, herbs, and garlic, is a fantastic alternative to premium beef cuts like ribeye or strip steak. My recipe brings out everything that makes flat iron special: it’s tender and juicy on the inside, with a crisp, flavorful crust on the outside. This isn’t just a regular recipe. It’s a step-by-step guide with photos that helps you get better at cooking any steak, not just this one.
Flat iron steak is the second most tender cut on the cow. It’s well-marbled and perfect for fast, high-heat cooking, which makes it ideal for pan-searing. This method is a great alternative to grilling, especially when the weather isn’t good for outdoor cooking. Just keep in mind that pan-searing indoors can get very smoky, so if you have a smoke detector nearby, it’s best to turn it off temporarily and open a window. Below is a step-by-step guide to cooking flat iron steak in a pan.
The Ingredients You’ll Need
- A flat iron steak (avoid butterflied or thinly cut cuts, go for a thicker, whole piece instead)
- 1 tablespoon high-smoke point oil (I always recommend avocado oil)
- 1 teaspoon kosher Salt
- 1 teaspoon finely ground pepper
- 2 tablespoons unsalted butter (about 28 g)
- 2-3 Garlic cloves
- 2-3 thyme or rosemary springs
The Tools You’ll Need
- Cast-iron/stainless steel skillet
- Tongs
- Instant Read Thermometer
Note
For this recipe, I used a flat iron steak that weighed about 1 pound (454 grams). Butchers trim this steak in different ways. Usually, you’ll get one long, flat, and rectangular piece; sometimes, they’ll divide it into a few smaller cuts. If possible, choose the thickest piece you can find. It’ll help you get that great crust on the outside while still keeping the inside medium rare.
How to Pan Sear Flat Iron Steak – Step by Step Photos

Pan-searing a flat iron steak on the stove might sound simple, but there are a few key things to watch out for. It’s easy to mess up; add the butter too early, and you can throw off the whole dish. Salt the steak at the wrong time, and you won’t get a good crust. Leave it in the pan too long, and it’ll end up overcooked. But don’t worry, I’ve put together a detailed, step-by-step guide with photos to help you get it just right every time.
Step 1: Prepare the Flat Iron Steak
Start by patting the flat iron steak dry with paper towels. Then choose your salting method based on how much time you have and the flavor you’re going for.
- Option 1: In a hurry? Simply salt the flat iron steak and let it sit at room temperature for 45 to 60 minutes before cooking. This gives the meat time to reabsorb most of the moisture on its surface, which will make the steak taste better and help you get a nice crust.
- Option 2: If you’re not in a rush and want much deeper flavor and an amazing crust, salt the flat iron steak and leave it at least 4 hours uncovered on a rack in the refrigerator. For best crust and flavor, leave it overnight in the refrigerator. Important! Remove it from the refrigerator for at least 30 minutes before cooking the next day.
Note
After salting a flat iron steak, the surface starts to get wet within a couple of minutes (usually around 2 or 3). That moisture is the enemy of a good crust. Give it about 45 to 60 minutes, and the meat will reabsorb most of that moisture. That’s why searing it anytime between 2 and 30 minutes after salting won’t give you a nice crust. The steak needs time to dry out first.
I like to salt flat iron steak the day before I cook it and leave it uncovered in the fridge overnight. This gives the salt time to do its job. By the next day, the surface will be completely dry, just what you need to achieve an amazing crust. On top of that, the flavor gets deeper and more concentrated thanks to the dry brining overnight.
Key point: Dry brining does wonders for flavor and texture, but the longer the steak sits with salt, the thicker the gray band forms just under the crust. It’s not a sign of overcooking, so don’t worry, it’s simply a side effect of the dry brining. That’s the small downside. To keep that gray band thin while still getting the benefits of dry-brining, go for about a 4-hour brine. Brining for about 4 hours is a solid compromise between a quick 1-hour brine and leaving it overnight. You still get the key benefits (better flavor, a drier surface, and slightly improved texture) without the thicker gray band.
Remember, don’t cook flat iron steak straight from the fridge. Want to know why? Check out my guide on Resting Steak Before Cooking: Why & How Long [Tested].

Step 2: Preheat the Pan
Heat a cast iron or stainless steel skillet over medium-high heat and let it sit for 2–3 minutes until it’s nice and hot. Add a high smoke point oil (refined avocado oil is a great choice), about two teaspoons or a tablespoon. Let the oil heat for another minute. By then, the pan should be at least 400°F (204°C), which is ideal for searing flat iron steak.
While the pan’s heating up, season the flat iron steak all over with finely ground black pepper.
Note
To get that perfect sear on a flat iron steak, you need serious heat, over 400°F (204°C). So you can’t just grab any pan for the job. A cast-iron skillet is the top choice because it distributes heat evenly and retains heat well. If you don’t have cast iron, a heavy-bottomed stainless steel pan is the next best thing.
You also need an oil that won’t burn or add any strong flavors. Refined avocado oil is a great choice, it has a high smoke point (510°F/265°C) and a neutral taste. Just be sure it’s refined, not unrefined. If you don’t have any on hand, no worries, I’ve listed a few other solid high-heat oils below.
| Type of Fat | Smoke Point ºF | Smoke Point ºC |
|---|---|---|
| Refined Avocado Oil | 520ºF | 270ºC |
| Refined Safflower Oil | 510ºF | 266ºC |
| Beef Tallow | 480ºF | 250ºC |
| Pecan Oil | 470ºF | 243ºC |
| Refined Peanut Oil | 450ºF | 232°C |

Step 3: Pan-Sear the Flat Iron Steak
Place the seasoned flat iron steak in a very hot skillet. Sear it, flipping every 30 seconds to build an even crust. Once the internal temperature reaches 90°F (32°C), reduce the heat to medium-low and move on to the next step.
Note
To get an even cook on a flat iron steak, keep flipping it every 30 seconds. It helps both sides brown nicely and gives you more control over the crust.
When it comes to timing, don’t rely too much on the clock. For example, I usually see the internal temperature reach around 90°F (32°C) after about 4–5 minutes of searing. However, the actual cooking time can vary and depends on factors such as flat iron steak thickness, pan type, and cooking temperature. The truth is, there’s no one-size-fits-all cook time. If you want to get it just right, use an instant-read thermometer. It’s the simplest way to avoid overcooking or removing the steak too early. Trust the temp, not the clock, and you’ll hit that perfect doneness every time.
Warning: high heat means smoke, usually a lot of it. Open a window, turn on the fan, and if there’s a smoke detector nearby, turn it off. Just don’t forget to turn it back on after you finish cooking.

Step 4: Baste the Flat Iron Steak with Butter
Add the butter to the pan along with a few garlic cloves and a sprig of thyme or rosemary. If your flat iron steak is thick, sear the edges while the butter melts. If it’s not, just wait for the butter to melt.
Once the butter has melted, move the flat iron steak to the other side of the pan. Tilt the pan slightly to pool the melted butter, then use a spoon to baste the flat iron steak, keeping a steady rhythm for about 30 seconds on each side. Alternatively, pool the butter in one spot and place the steak directly in it and flip it every 30 seconds until it’s about 20–25°F (11–14°C) below your target doneness. Then take it out of the pan. And don’t forget to turn off the heat, you don’t want that butter to burn. You’ll need it in the next step.
Note
Add the butter once your flat iron steak reaches 90°F (32°C). If you ignore that and add the butter too early, you’ll risk burning it. Remember that its smoke point is only around 300°F (149°C). Burnt butter doesn’t add depth or richness; it adds bitterness and disappointment. It’s one of the easiest ways to ruin a great steak, so don’t let that happen.
One of the biggest mistakes with pan-seared steak happens after it’s off the heat. Just because it’s out of the pan doesn’t mean it’s done cooking. In just 5 to 10 minutes, carryover cooking can raise the steak’s internal temperature by 15 to even 30°F (8 to 17°C) as it rests. That’s more than enough to turn a perfect steak into an overdone one. So, don’t judge doneness by how the steak looks in the pan, especially with thicker cuts. (Note: This applies to pan-seared thick steaks, not ones cooked sous vide or with a reverse sear.)
Let’s say you’re going for medium-rare on a flat iron steak, somewhere between 130–135°F (54–57°C). To hit that target, take it off the pan when it hits around 110°F (43°C). Want to see what different doneness levels look like? Check out the temperature chart in the FAQs.

Step 5: Let the Pan-Seared Flat Iron Steak Rest
Don’t skip this step: after cooking, let your flat iron steak rest on a cutting board for about 5 minutes. If it’s a thicker cut, give it a bit more time, around 6 to 7 minutes. While it rests, the residual heat (known as carryover cooking) will finish the job, gently bringing the steak’s internal temperature up to your target doneness.
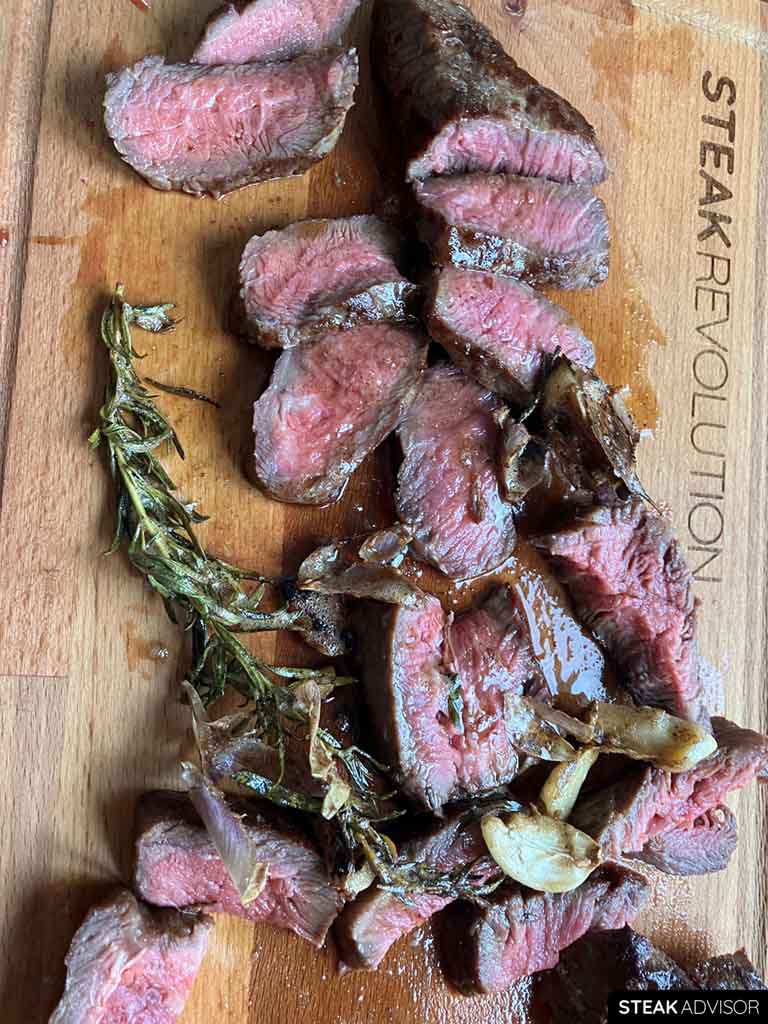
After resting, slice the flat iron steak against the grain to keep it as tender as possible. Don’t skip this, slicing the wrong way can make even a perfectly cooked steak less tender.
Once it’s sliced, pour any leftover butter from the pan over the flat iron steak. If the butter has cooled down, just warm it up quickly. Finish it off with the fried garlic and herbs for the final touch.
Note
That short resting period lets the heat inside the flat iron steak finish the job, slowly bringing it to perfect doneness (this is known as carryover cooking). If you slice it immediately after taking it off the pan, you’ll cut that process short and miss out on the perfect doneness. The only time it makes sense to slice immediately after cooking is if the steak has already reached your target temperature and you want to stop it from cooking any further.


FAQs
When’s the best time to take a flat iron steak off the pan?
After you take a flat iron steak off the pan, it doesn’t stop cooking; in fact, its internal temperature can increase by 15 to 30°F (8 to 17°C) as it rests. The thicker the cut and the longer it’s been on the heat, the more the temperature will increase. That’s why it’s important to take your flat iron steak off the pan before it reaches your target temperature.
Here’s a simple table showing when to take a flat iron steak off the heat to hit your desired doneness:
| Doneness | Remove at temp: | Final temp: |
| Rare | 100–110°F (38–43°C) | 120–130°F (49–54°C) |
| Medium Rare | 110–120°F (43–49°C) | 130–140°F (54–60°C) |
| Medium | 120–130°F (49–54°C) | 140-150˚F (60–66°C) |
| Medium-Well | 130–140°F (54–60°C) | 150-160˚F (66–71°C) |
| Well Done | 140–150°F (60–66°C) | 160°F+ (71°C+) |
Let me give you an example. I removed my flat iron steak from the pan at 111°F (44°C), and within just 5–6 minutes, its internal temperature increased to 132°F (56°C), a 21°F (12°C) jump! (Check out the photos below.)
Many recipes suggest removing the steak 5–10°F (2–5°C) before the target temp, but based on my experience and tests, that’s not enough. If you take it off at 120°F (49°C), don’t be surprised if it ends up around 140°F (60°C). This kind of jump is most common when you’re cooking over high heat in a pan or on the grill. If you’re using the reverse sear method, the carryover effect is much smaller, sometimes barely noticeable.
To learn more, check out my full guide on How Long to Let Steak Rest After Cooking.
What is the ideal thickness for a flat iron steak when pan-searing?
The ideal thickness for a flat iron steak depends on how you like it cooked. If you’re aiming for medium-rare (130–140°F / 54–60°C), go for at least 1.25 inches (3.175 cm) thick. Here’s why: if the flat iron steak is too thin, it’ll cook through before the outside has time to form that nice, crispy crust.
Take a look at the example below. The flat iron steak on the left was cooked to 132°F (56°C), and the one on the right to 124°F (51°C). Notice how the crust on the right one looks way better? That steak was thicker, so it needed a longer cook time, which helped the crust form nicely. Sure, it’s not a perfect side-by-side since the doneness levels are slightly different, but the difference is clear: a thicker steak gives you a better crust while still keeping the inside rare to medium-rare.


What is the ideal doneness for a flat iron steak?
In my opinion, flat iron steak is at its best when cooked to medium-rare doneness. That’s when the marbling starts to melt, adding flavor and tenderness without overcooking the meat. Anything below medium-rare doesn’t give the fat enough time to melt. Still, taste is personal; some like it closer to medium or even medium-well, and that’s fine. One of the best things about flat iron steak is that it stays tender and juicy even when cooked a bit more, similar to a good ribeye steak.
Print
Pan-Seared Flat Iron Steak Recipe
- Prep Time: 10 minutes
- Rest Time: 1 hour
- Cook Time: 10 minutes
- Total Time: 1 hour 20 minutes
Description
This pan-seared flat iron steak, basted with butter, garlic, and fresh herbs is one of the best ways to prepare flat iron steak. It’s a simple, no-oven-needed recipe.
Ingredients
- A Flat Iron Steak (Avoid butterflied flat iron steaks or thinly cut; choose the thicker ones)
- 1 tablespoon high-smoke point oil (I always recommend avocado oil)
- 1 teaspoon kosher Salt
- 1 teaspoon finely ground pepper
- 2 tablespoons unsalted butter (about 28 g)
- 2–3 Garlic cloves
- 2–3 thyme or rosemary springs
Instructions
- Prepare the Flat Iron Steak: Start by patting the flat iron steak dry with paper towels. Then choose your salting method based on how much time you have and the flavor you’re going for. Option 1: In a hurry? Simply salt the flat iron steak and let it sit at room temperature for 45 to 60 minutes before cooking. This gives the meat time to reabsorb most of the moisture on its surface, which will make the steak taste better and help you get a nice crust. Option 2: If you’re not in a rush and want much deeper flavor and an amazing crust, salt the flat iron steak and leave it at least 4 hours uncovered on a rack in the refrigerator. For best crust and flavor, leave it overnight in the refrigerator. Important! Remove it from the refrigerator for at least 30 minutes before cooking the next day.
- Preheat the Pan: Heat a cast iron or stainless steel skillet over medium-high heat and let it sit for 2–3 minutes until it’s nice and hot. Add a high smoke point oil (refined avocado oil is a great choice), about two teaspoons or a tablespoon. Let the oil heat for another minute. By then, the pan should be at least 400°F (204°C), which is ideal for searing flat iron steak. While the pan’s heating up, season the flat iron steak all over with finely ground black pepper.
- Pan-Sear the Flat Iron Steak: Place the seasoned flat iron steak in a very hot skillet. Sear it, flipping every 30 seconds to build an even crust. Once the internal temperature reaches 90°F (32°C), reduce the heat to medium-low and move on to the next step.
- Baste the Flat Iron Steak: Add the butter to the pan along with a few garlic cloves and a sprig of thyme or rosemary. If your flat iron steak is thick, sear the edges while the butter melts. If it’s not, just wait for the butter to melt. Once the butter has melted, move the flat iron steak to the other side of the pan. Tilt the pan slightly to pool the melted butter, then use a spoon to baste the flat iron steak, keeping a steady rhythm for about 30 seconds on each side. Alternatively, pool the butter in one spot and place the steak directly in it and flip it every 30 seconds until it’s about 20–25°F (11–14°C) below your target doneness. Then take it out of the pan. And don’t forget to turn off the heat, you don’t want that butter to burn. You’ll need it in the next step.
- Let Flat Iron Steak Rest (Don’t skip this step!): After cooking, let your flat iron steak rest on a cutting board for about 5 minutes. If it’s a thicker cut, give it a bit more time, around 6 to 7 minutes. While it rests, the residual heat (known as carryover cooking) will finish the job, gently bringing the steak’s internal temperature up to your target doneness.
- Serve the Pan-Seared Flat Iron Steak: After resting, slice the flat iron steak against the grain to keep it as tender as possible. Don’t skip this, slicing the wrong way can make even a perfectly cooked steak less tender. Once it’s sliced, pour any leftover butter from the pan over the flat iron steak. If the butter has cooled down, just warm it up quickly. Finish it off with the fried garlic and herbs for the final touch.
Notes

My flat irons are USDA Choice, should I consider jaccarding them?
Your thoughts on allowing to steak to sit at room temp before cooking.
Got 2 steaks waiting for your response.
Thanks,
Pete
Hi Pete,
I’ll soon publish an article about the effects of letting steaks rest at room temperature before cooking. From what I’ve found so far, it’s definitely a good idea to let the steak sit out for about 30 minutes to cook more evenly in the center. As for using a Jaccard, why not try it on just one of your steaks since you have two steaks? Then, you can cook both and see the difference for yourself. It could be a fun experiment.
EDIT: I published the ‘How Long to Leave Steak Out Before Cooking‘ case study, where you can learn why it’s better to leave the steak out for 30 minutes at room temperature.