
Description
This pan-seared strip steak has a deep, dark, and crispy crust on the outside and is perfectly cooked inside, with only a relatively thin gray band under the crust. Finished with garlic-herb butter, it’s incredibly rich, flavorful, and surprisingly simple to make at home.
Ingredients
For Steak:
- About 1 1/2-inch (3.8 cm) thick new york strip steak (if you’re skipping the butter basting and using compound butter instead, you can go with a cut about 1 inch/2.5 cm thick)
- 1–2 tablespoons (15–30 ml) high-smoke-point oil (I recommend refined avocado oil)
- 1–2 teaspoons (5–10 g) kosher salt per steak (1-1.5% of the steak’s weight in salt)
- ½ teaspoon of finely ground black pepper per pound (454 g) of steak (optional)
- 2 tablespoons (30 g) unsalted butter (optional)
- 2-3 garlic cloves (optional)
- 2 sprigs of fresh thyme or rosemary (optional)
- Compound butter (optional)
Tools:
- Pan (cast-iron, carbon steel or heavy-bottomed stainless steel skillet)
- Tongs
- Meat thermometer (instant-read or probe thermometer)
Instructions
- Before we start, decide which aromatics you want to use and how you want to finish the steak. To keep things simple and reduce the risk of overcooking, skip the butter basting and place a slice of compound butter on top of the steak as soon as you take it out of the pan. Alternatively, prepare the aromatics in the pan while the steak rests after searing.
- After that, gather your ingredients and tools, then follow the steps below.

Prepare the Strip Steak
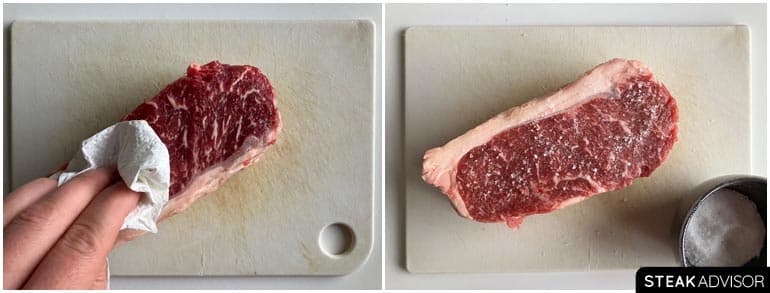
- Take the strip steak out of the fridge, pat it dry with paper towels, and season both sides with 1-2 teaspoons of kosher salt (about 1–1.5% of the steak’s weight). After that, decide on the next step based on the desired results and available time:
- If you’re short on time: Leave the salted strip steak at room temperature for about 1 hour. That’s the bare minimum for dry-brining.
- If you have a few hours: Let it sit in the fridge for 4–6 hours. This is the best option if you want great flavor, a beautiful crust, and a minimal gray band under the crust. I highly recommend this option.
- For maximum flavor: You can dry-brine the steak for 12–24 hours, but expect a much thicker gray band under the crust (you won’t get that wall-to-wall pink doneness gradient inside). If the gray band isn’t an issue for you, go for it. The flavor and crust are phenomenal after a long dry brine.
Preheat the Pan
- Regardless of the salting method you choose, remove the steak from the fridge 30 minutes before cooking and let it sit at room temperature.
- Place a heavy pan on medium-high heat, preferably a cast-iron skillet (or stainless steel or carbon steel). After about 3-4 minutes, add 1–2 tablespoons of high–smoke-point oil and let it heat for another minute.
- While the pan is heating, pat the strip steak dry again and season it with 1/2 teaspoon of finely ground black pepper per pound/454 g of steak (optional). Then move on to the next step.

Pan-Sear the Strip Steak
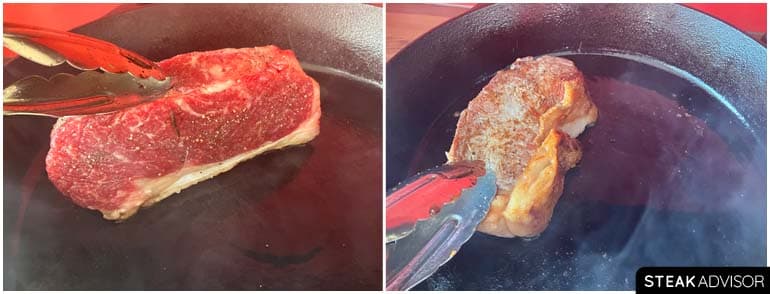
- Start by placing the strip steak, fat side down, to render some of the fat. Let it sear for 60–90 seconds, and once the fat looks nicely rendered (browned and crispy), flip the steak to the meat side and start searing, flipping it every 30 seconds.
- Keep searing until the steak’s internal temperature reaches 90°F (32°C) if you plan to butter-baste it. Once it reaches that point, move to section “butter basting”.
Butter Basting (optional)
- Don’t start searing the steak with butter. Its smoke point is too low, and it will burn long before the steak is ready. Wait until the steak reaches about 90°F (32°C) if you’re aiming for medium-rare/medium, or 100°F (38°C) if you want it medium/medium-well.
- Once it reaches that point, add the garlic, herbs, and butter to the pan, then lower the heat to medium-low. Let the butter melt, then tilt the pan and spoon the melted, aromatic butter over the steak.
- Baste for about 30 seconds per side, checking the temperature as you go. Keep cooking until the steak is about 20°F (11°C) below your target doneness (see the temperature chart below), then remove it from the pan and let it rest for 6–7 minutes.
- Alternatively, tilt the pan to pool the butter, then place the steak directly in it and flip it every 30 seconds until it’s about 20°F (11°C) below your target doneness. Basting looks cool, but honestly, both methods give you almost the same result.

Simpler No-Baste Option
- If you want to keep things super simple, you can skip the butter basting. In that case, flip the steak every 30 seconds until the internal temperature is about 20°F (11°C) below your target doneness (see the temperature chart above). Then turn off the heat, remove the steak from the pan, and let it rest for 6-7 minutes.
- While it rests, you can finish it with compound butter or prepare the aromatics in the pan (see instructions in the next section).
Aromatics or Compound Butter Finish (optional)
- If you skipped the butter basting, here are two simple ways to finish the steak with aromatics:
- Option 1 (compound butter): Place a bit of compound butter on top of the steak right after you take it out of the pan.
- Option 2 (if you don’t have compound butter): Use the same pan you seared the steak in. Lightly brown a few peeled garlic cloves over medium heat, then add a couple sprigs of rosemary or thyme, and 2 tablespoons (30 g) of unsalted butter, letting it melt. Turn off the heat and pour the mixture over the sliced steak.

Slice and Serve the Steak
- After cooking, don’t forget to let the steak rest for about 5 minutes for cuts about 1 inch (2.5 cm) thick, and 6–7 minutes for steaks about 1½-inches (3.8 cm) thick.
- Once it’s rested, pour any leftover pan butter over the steak along with the garlic and rosemary (if you used them). If you used compound butter instead, you can go straight to slicing. For well-marbled strip steak, slice it however you like. For leaner cuts, slice against the grain (see notes below). Then serve with your favorite sides.

Notes
Slice against the grain
If you’re working with a lean strip steak, it’s a good idea to slice it against the grain. This shortens the muscle fibers, making each bite easier to chew. It’s one of the simplest and most effective ways to turn a slightly tough, chewy cut into something noticeably more tender, since your teeth don’t have to work as hard to break through the muscle fibers. If you’re not sure how to find the grain direction, check out my steak slicing guide.